Blessings Of The Forge
Lost in the Sauce: Shaders

So, there I was sitting and thinking about my game. I was thinking through all the things with what I'd like to do and how some things need to change. Then I had a thought, a very dangerous thought. "Ya know... with glowing hot metals, the flicker of the fire from the forge, and the dim, early rays of the morning light peaking in from a full night of experimenting with metal, my game could do so much with dynamic lighting" So, like the newbie developer I am, I googled dynamic lighting in godot. What has proceeded is two weeks of banging my head against the desk trying to understand shaders, ray tracing, signed-distance fields, and GPU processing as compared to CPU processing.
This stuff is COMPLICATED!!!
So, today I'd like to share my journey through understanding lighting, some of the techniques I've come across, and where I'm at with things. My journey began like I said looking up lighting in godot. Godot comes with about 5 nodes for lighting in 2D (Because I'm stubborn and refuse to change my project to 3D. We'll get into that more later) Most of the nodes are not really what I'm looking for. Either you attach a texture that serves as the "lighting" or you simply mess with a couple of variables that determines directions and apply to the whole scene. Two nodes that I did find though were the Occluder2D and the shader script. From what I experienced, the occluder only really interacted with the shader script, and the shader can do dynamic lighting. Jackpot! So, I quickly looked up dynamic lighting with shaders. A lot of different results popped up, including many shaders that had nothing to do with lighting. One thing I found was a demo made by KPas.
Dynamic 2D Lights and Soft Shadows - Godot Shaders (Post made on godotshaders.com)
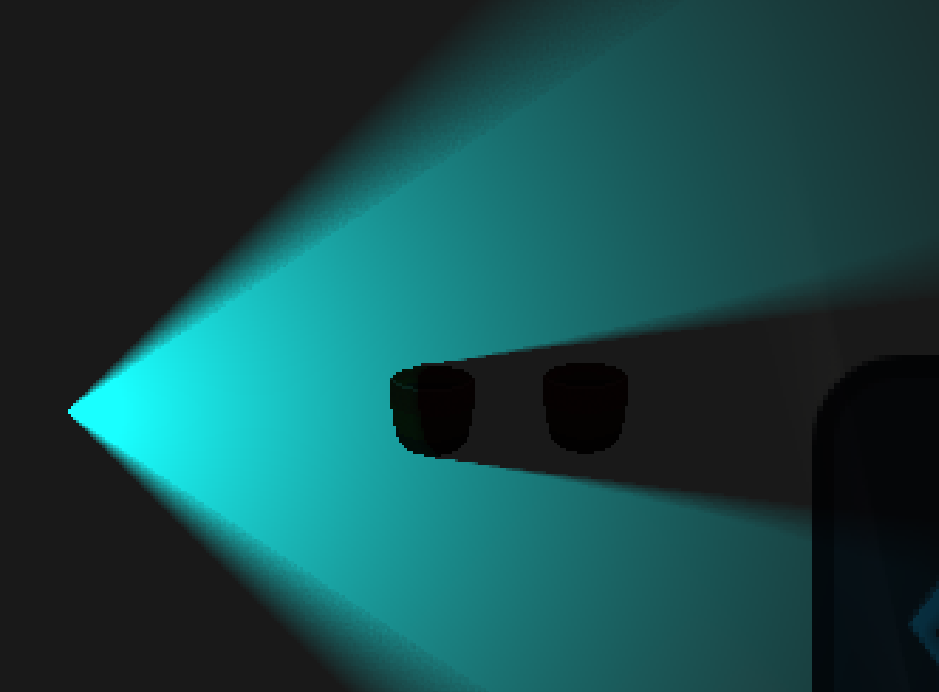
This was great, and the shadows looked clean. I can mess with a bunch of variables and even add new lights. But there were some issues. With the way the rendering worked, even if I zoomed into the scene so the pixel sized are larger (as my game is heavily reliant on pixel art) the lighting and shadows still had a crisp, high resolution to them. This was not what I wanted, and I spent some time going back and forth between looking for a new shader, and trying to edit this project to suite my needs. I eventually was able to edit the project a bit to get the pixelated shading that I was looking for. The result is the first image in this post at a 1080p resolution.
I continued to mess with the shader code to try and understand what it was doing and how I could mess with things to get what I wanted. As best as I understand, It uses ray marching to go from a light to a pixel, and uses a signed-distance field (basically fancy jargon for "distance to closest object/occluder") to see where the ray is stopped. Do that for every light and some math for soft shadows, and you have what color that pixel needs to be. This was great, but still more complicated than I fully understand. And I'm still not entirely sure how exactly ray marching works.
I kept messing with things to change some small details. One fun one that I was able to change was the little square patterns on the light fan in the soft shadows (you can see what I mean in image 1 if you zoom in). This wasn't an issue with the crisp, zoomed out shadows created by the original project, but now that it was pixelated it was very noticeable to me. So, a quick fix that I messed with was adding a noise algorithm to the edges of the fans(image2). In my opinion this created a fun, stylized fan that I was pretty okay with. I still pressed through the code, the references in the post, and google to try and understand better why those squares were there and other parts of how the code worked.
While working through that, I came across sam bigos' post and tutorial for his lighting algorithm.
https://samuelbigos.github.io/posts/2dgi1-2d-global-illumination-in-godot.html
It seemed to have a somewhat realistic light simulation that was pixelated, and curved around walls(something I do want in my shader as well). Perfect right? Well, I started working through some of it, and how it works is much beyond me, but it seems to take a different approach from the SDF, but generates a similar idea that it uses before simulating the light. When running the project, while the general view of the light simulated very well, it was super staticy/noisy, and the performance was really rough. I maybe could have taken the light implementation and tie it instead to the SDF, sort of combining the two projects, but I couldn't understand the light simulation well enough to know how to do that. However, I do love that the examples has full sprites that are lights (another thing that's going to come up later) and the light curls around corners and bounces off of walls. But the performance seemed too much of a cost, especially considering that I plan to have many light sources and occluder objects, and that this is SUPPOSED to be a nice polish detail in the game.
It wasn't until I was showing a youtuber that I like to my friend. I remember a few years ago following his tutorial to build a 3D renderer in C++. While scrolling through his videos, I saw "Line Of Sight or Shadow Casting in 2D".
What?! That seems promising! After talking with my friend I went back to my computer and started skipping through the video to understand how it worked. And it sort of did what I had thought would be a much easier method. Instead of ray marching, couldn't I do what 3D graphics does, but in 2D sort of? Like, from a given point, couldn't I scan the walls to see what was visible, then simply draw the light in the visible area? Turns out, that's essentially what this algorithm does. I skimmed the video and a couple of posts he had linked in it to get an understanding of how everything worked.
https://www.redblobgames.com/articles/visibility/
https://ncase.me/sight-and-light/
I also found from one of the pages a godot implementation. Excelent! I quickly copied the code and... it didn't work. Nothing surprising there. The code was written a few years ago in godot 3.0, so if I wanted to use it, I had to update it for the version I was using. Thankfully I got busy doing some other stuff, and in my spare time really tried to wrap my head around what was going on. I drew it out on graph paper and got a basic idea. After referencing the posts a couple more times I sat down to code. I usually work in a prototypes folder I've created in my project, but for a number of reasons I decided to start with an empty project.
Here's the basics of what I did and how the code works. (Note, Techy stuff ahead)
Firstly, I get the polygons of the occluders. Then, by cycling through the points I can draw them. No rocket science there. After that, I wanted simple "ray tracing". So, I take the mouse position and draw a line from the mouse to each of the points on the polygon. Just make sure to redraw things every frame and bam! We got rays! However, how do we check to see if the "ray" hits a wall before getting to its destination? Well, when I cycle through the polygon I can also create an array of walls. For each pair of points, add the two points as an element of the array. Then, godot has a handy "segment_intersect_segment" function. So, take the start and end point of the array, and the start and end point of each walls and see if they intersect. If so, store that end point. If not, store the original end point. Excellent, we have wall detection!
Now is where things get a little complicated, at least for me. We have a bunch of points, but I ran into many issues trying to draw triangles out of them. So, what do we do? Well, firstly we have to sort the points by angle. We want the program to draw triangles between each point, but I ran into issues with my sorting function, meaning random triangles were being drawn all over the place. This was super confusing when running the project because nothing made sense visually. But I still ran into issues with the triangles after this. There was a ton of clipping over objects and many other visual issues.
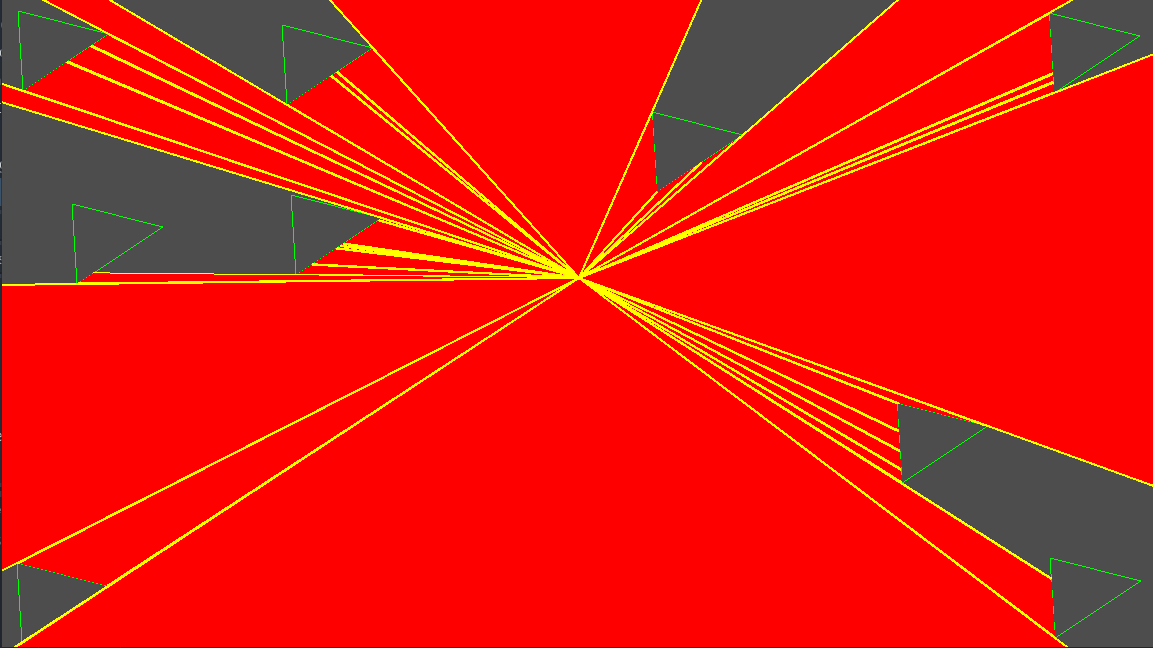
So, after looking back through the posts on this method, I realized why we had to actually use 2 rays for each point (we actually use 3, but we aren't there yet). If we think of each edge of a wall, one side of the point is the wall, and the other should go past the wall. So, if instead we shoot 2 rays for each point, one on either side of the wall (angle of the origin to the point plus like 0.001 or something) and sent beyond the point to the light distance, we should get 1 ray that goes past it, and one ray that stays at it. We can draw a triangle between those two, and use each of those for the larger and smaller triangles that comes from that point. I put all this in there, certain that was the issue, and ran the project. Nope, still looked like crap. I was very confused.
Then, after a while I realized the issue. I only had 1 polygon on the screen, so the last triangle drawn between the edges of the fan was like 290 degrees. And since the drawpolygon() function only took three points, it just turned that 290 degree angle to a 70 degree one. *Insert many facepalms here* For a quick hack I took 4 occluders and put them each in the corner of the screen. Ran the project again and bam! Image 3!!! Side note: This is out of order slightly for those who want to understand the process. I actually had that issue in my sorting function at this time still and a couple of other logic errors in my code. It was only after fixing all of those issues that this finally worked.
Well, after getting up and having fun with my now working line of sight algorithm, I realized some definite areas for improvement. Firstly, I cleaned up my code a bit, making it clearer what was going on. (btw, the full thing is only 100 lines. So much simpler than the other stuff I was looking at) I also fixed a memory leak that was causing serious frame drops. The scene quickly went from like 10fps to an even 60 no matter how much I tried to overload it. The next issue was I noticed we were drawing way too many triangles. If one wall had like 5-10 wall points behind it, we would draw like 10-20 triangles within that one wall segment. I saw this as a serious cost that would become an issue later.
I needed a way to know if I needed to draw a triangle. (Side note, if I had just followed any one of like 3 tutorials this and many of my other issues would have easily been avoided. but nooo... I have to write MY OWN algorithms) Remember how I mentioned we need 3 rays? Yep, time for that part of the code. After a lot of finicking with things, I realized I only needed to draw triangles from the angles of the visible vertices. So, if I first shot a test ray straight to the wall endpoint, I could check to see if it hit any walls on the way. If it did, that point would be skipped. Otherwise, we would shoot out the 2 rays on either side like before. It took a little messing with things to get it working, but afterward it worked like a charm. Image 4 is the result. This is so much cleaner, and I'm excited to continue working on it.
Here's some thoughts, plans, and ideas for moving forward.
Firstly, I think there's still some things I can do to clean up the algorithm. One of the things I'd like to do is sort the wall array in relation to the origin point. Basically, I'm currently checking every ray with every wall. That's a but much, and I don't need to be checking walls that are either outside of the range, or on the opposite side of the origin. So, if I can effectively sort the walls to where they can be referenced in relation either to angle or distance, that will make things much faster. (a wall can maximally only cover 180 degrees after all)
After that, I want to allow the light to be a fan instead of a full 360. The reason for this is because I want the light to wrap around corners. I think if I take each end point that the light hits as a new source for the light, I can simulate another fan between that ray and the wall it's touching. Do this like 3/4 times or until the distance runs out, and I think I can have a nice light wrapping effect where we will be able to simulate ambient light around walls.
Next, I would like to create a "light polygon" class that stores the triangles, and what types of triangles they are. If they have neighbor triangles on either side, they are full. If one side is missing, they are a soft shadow in that direction. After this, I'm hoping I can pass this map to a shader. Then, for each pixel in the shader, simply see what triangles they overlap with, and what kinds of triangles they are to calculate the light of that pixel. I'd also like to see if I can use a compute shader to create this map with the GPU as well.
After this, I hopefully will have a really nice lighting shader that will work very well. However, I still have several problems with it. Firstly, All this math is from a single point, and I ultimately would like glowing sprites, not point lights. I could either just settle with a point light centered on the sprite, or calculate the light from each pixel, but I'm not sure I like either of those solutions. Part 2 of that issue is that the polygons I've been working with are triangles. I have no idea how the performance is going to hold up once I outline sprites as occluders and each one has dozens of walls. Hopefully the optimizations I mentioned will help with this, but if I plan to do that I really think I need the compute shader to work. The next issue is with the occluders. If an object is in the way, I would like that object to become illuminated. Currently, the walls are solid, not allowing any light at all to go through. How do I calculate the lighting for that object based on its orientation with the light.
Now for the two issues that will really get me in trouble. Most of these shaders are implemented top down, but my game is 3/4 top down. I could maybe adjust the sprites slightly to where it feels maybe more 7/8 top down, and hope the lighting doesn't look weird, or own it as my style, but I'd really like some what to simulate the 3/4 top down light. The first issue would be the walls. This one shouldn't be too bad because I can probably just highlight a certain number of pixels into walls depending on their orientation. But the real issue is with the other objects. Call me crazy, but I'd really like the light to shine over objects casting their shadows on the ground. I'd also like a chandelier to brighten a whole room, but a lamp on the ground to cast shadows across a room. That is gonna take a lot of time to solve and I'm not sure it's entirely possible without going to 3D (Which I REFUSE to do!!! Told you that would come back :P) I think I might be able to simulate a 3D feel in 2D by assigning a height value to each occluder and light. The blocked rays would then continue after the math of their angle and where the floor is if that's still in range of the light. The issue would then be relative heights between objects and those darned wall tiles again. I'm still messing with the idea though and I may just go with a stylized 2D shader in the end. But, if I can sit down and figure out how to simulate 3D light in 2D in an efficient way, I think it it will give my game a unique immersion that I haven't seen in other 2D games.
Anyways, this is what I've been working on this week. I know it's a long post, but it was fun compiling everything I've learned over the last 2 weeks. If you've made it this far, congrats! If I had a cookie I'd honestly give you the whole batch. I hope you enjoyed and maybe learned something about shaders. This next week I might take a step away from shaders just so I can get some actual development on the game done, but we'll see. Hope to catch you next time!
Lastly, if any experienced dev who actually knows what they're doing reads this and can magically get my ideas working, let me know. I'd love to see what someone comes up with from this.
Get Blessings Of The Forge
Blessings Of The Forge
A Better Way To Smith
| Status | In development |
| Author | Forgotten Throne |
| Genre | Simulation |
| Tags | 2D, blacksmithing, Casual, Cozy, Crafting, Experimental, Godot, Pixel Art, Swords |
| Languages | English |
More posts
- Pre-1.3 Release55 days ago
- Can a brain code a brain?74 days ago
- Shop System, Common Orders, and NPCs88 days ago
- Update on Shaders and Lighting95 days ago
- I'm LEARNING! Game Dev Math: 1 = 2Jul 11, 2025
- The Pre-Release UpdateJul 01, 2025
- New Mechanics And Next StepsJun 21, 2025
- UI OverhaulJun 11, 2025
- The Demo Is Out! (Finally...)May 31, 2025
- The Devlog You Deserve (and Probably Forgot About)May 25, 2025
Leave a comment
Log in with itch.io to leave a comment.